Member Management Feature User Manual
This manual provides detailed instructions for using the "Member Management Feature" of the 1share platform, including operational guidelines, practical examples, and frequently asked questions. It is designed to help administrators efficiently and accurately manage member information, enhancing member service satisfaction.
Feature Overview
The Member Management feature offers a comprehensive and intuitive interface for managing member data. Key functions include searching member information, bulk importing and exporting data, and viewing and editing detailed member profiles. Administrators can quickly process member data, ensuring updates are timely and accurate.
Main functions include:
- Member data search
- Bulk import of member data
- Bulk export of member data
- Viewing and editing detailed member information
- Member permission settings and management
Operation Instructions
Searching Member Data
- Log in to the backend system and navigate to "Management Area > Member Management."
- Enter member account, name, phone number, or other relevant information into the search box.
- Click "Search" to display the list of members matching the criteria. Click on a member's name to view detailed information.
Bulk Importing Member Data
- In the "Management Area > Member Management," click "Import Member Data."
- Download and fill in the provided template file, ensuring all required fields are fully completed.
- Select and upload the completed file. After verifying that the data is correct, click "Import" to complete the bulk import.
Bulk Exporting Member Data
- Navigate to "Management Area > Member Management" and select "Export Member Data."
- The system automatically generates an export file in Office Excel 2003 format, suitable for subsequent data handling and management.
Viewing and Editing Member Information
- Search for the member and click their name to enter the detailed profile page.
- The page will display comprehensive member information, including account details, name, contact methods, address, educational background, and more.
- To modify information, click "Edit," make necessary adjustments, and ensure you click "Save" to update the data.
Detailed Function Descriptions
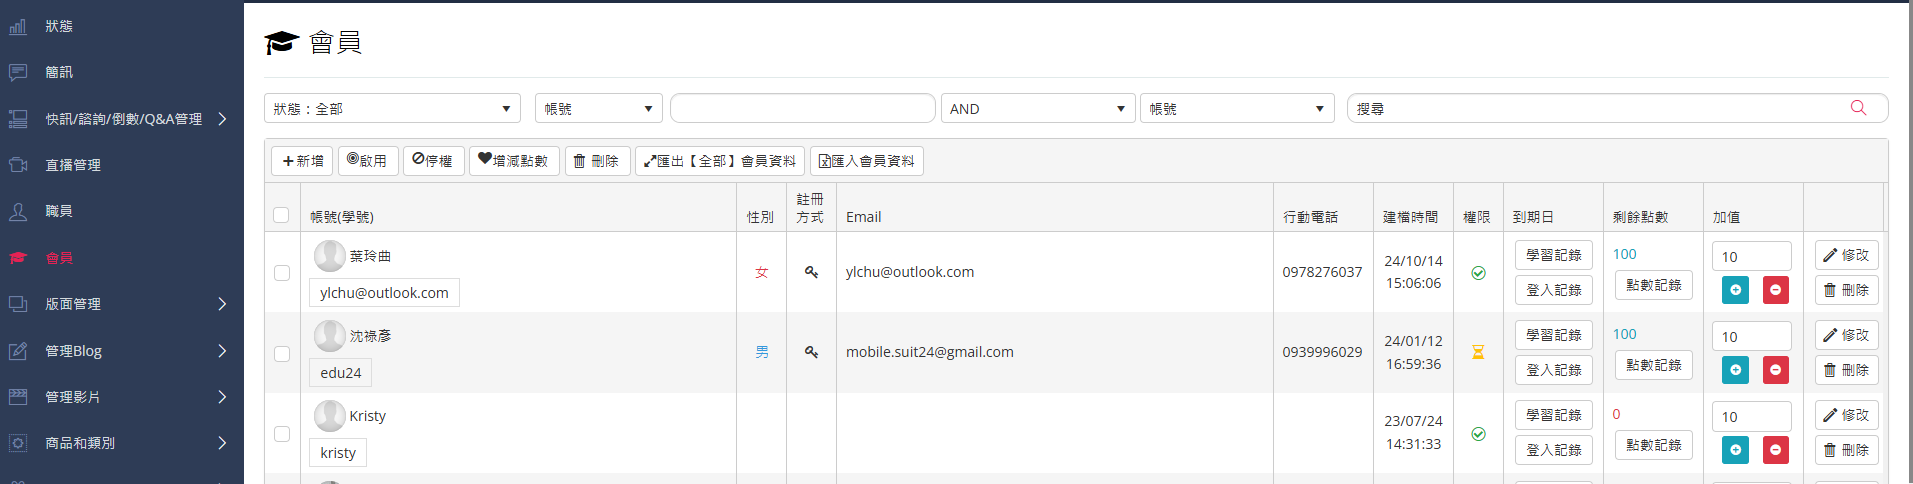
Member Management Main Page
Management Area > MemberThe main page provides member data search functionality, bulk import options, and a comprehensive member data list display, facilitating efficient management actions.
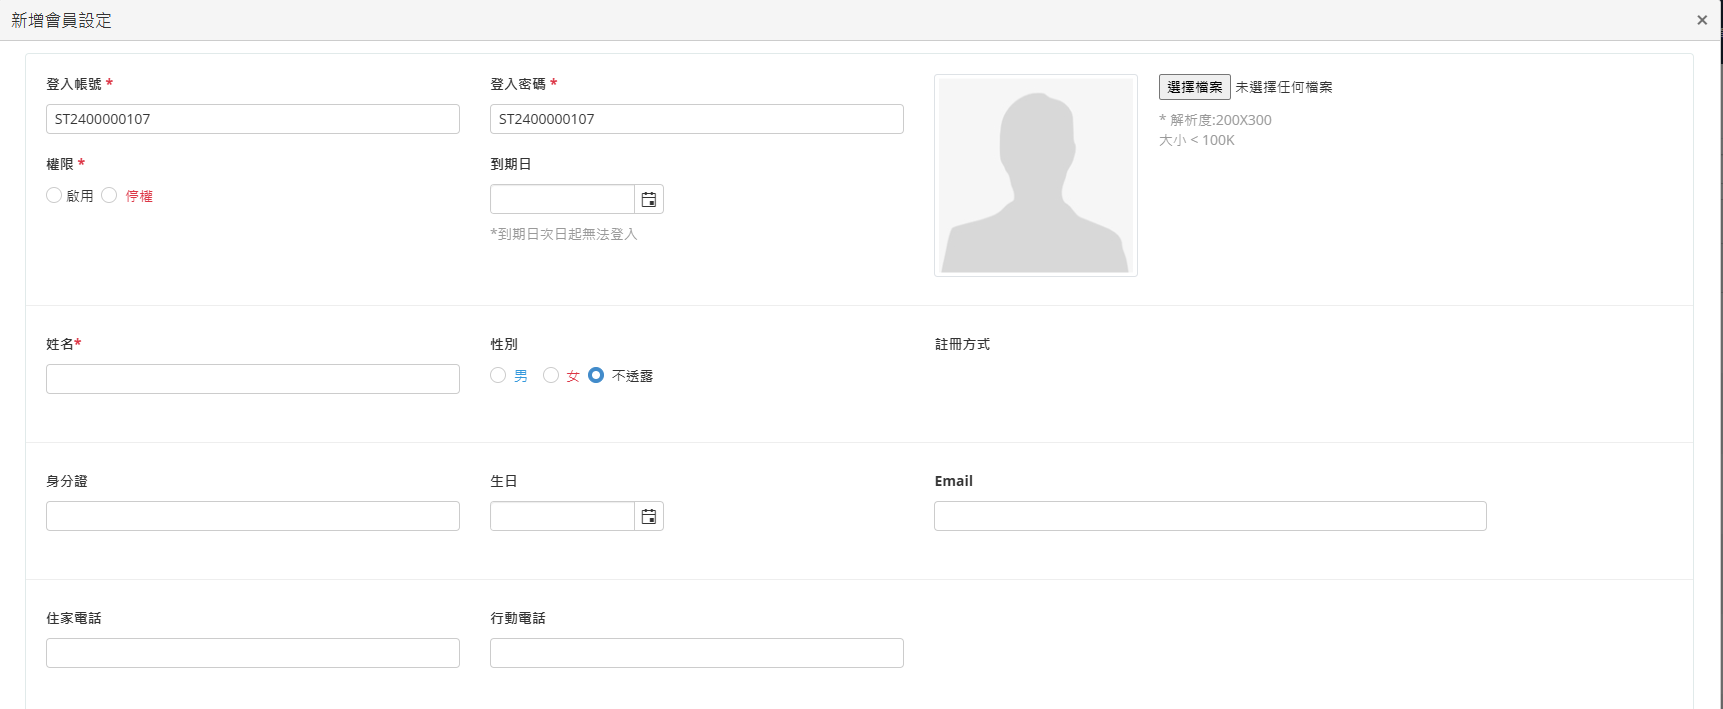
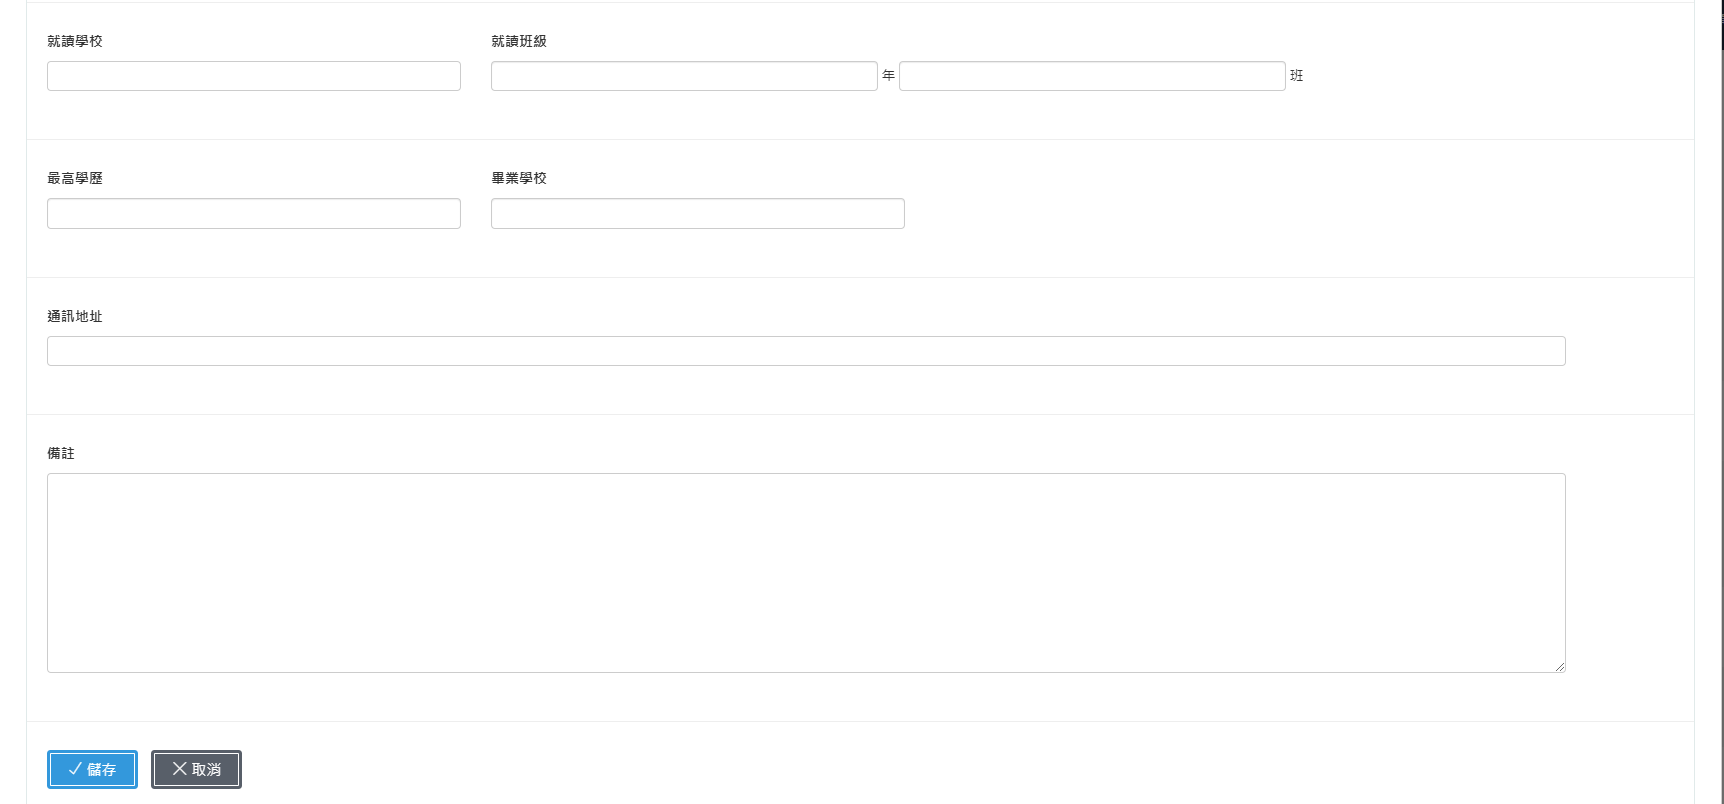
Adding a New Member
Management Area > Member > Add NewWhen adding a new member, administrators can enter login account details, password, permissions, validity period, name, gender, ID number, birthday, EMAIL, home phone, mobile phone, school and class attended, highest education level, graduation school, mailing address, and additional notes. After filling out the form, click "Save" to complete the addition.
Exporting Member Data
Management Area > Member > Export Member DataThis function allows administrators to export member data into an Excel file. It is recommended to use Office Excel 2003 format for subsequent data processing to ensure compatibility.
Importing Member Data
Management Area > Member > Import Member DataAdministrators can use this bulk import feature to quickly add large amounts of member data. It is crucial to use files in Office Excel 2003 format to ensure smooth data importing.

Practical Usage Scenarios
- Mass Member Enrollment at the Start of a Semester: Bulk import member data efficiently at the beginning of each semester, significantly saving manpower and time.
- Handling Lost Member Information: Quickly locate members who have forgotten their account or password, providing immediate assistance.
- Periodic Update of Member Data: Regularly update members' contact information and personal details to ensure accuracy and up-to-date records.
- Adjusting Member Permissions: Modify member permissions as needed based on role changes to maintain operational efficiency.
- Regular Backup of Member Data: Periodically back up member data through the export function, ensuring data security and facilitating future restoration.
Frequently Asked Questions
Q1: What should I do if I encounter an error message when importing member data?
First, verify that the file format and data fields meet the system requirements. If the problem persists, please contact the system administrator immediately for further assistance.
Q2: If I notice errors in the imported batch data, can I upload the corrected data again?
Yes, you can re-upload corrected data using the bulk import function. The system will automatically overwrite the old data.
Q3: How can I quickly adjust permissions for multiple members at once?
Currently, the system supports individual adjustments only. It is recommended to use the member list to quickly adjust each member's settings.
Q4: Can members modify their own personal information?
General members can modify their basic information independently, but sensitive data such as permissions and validity periods are restricted to administrators.
This manual strives for accuracy and completeness, but we do not assume any liability for errors, omissions, or updates. The content may be modified at any time without prior notice. We are not responsible for any damages arising from the use of this manual or downloading its contents, including but not limited to system failures, data loss, or infringement of rights. Users assume full responsibility and risk.
1share® 是一家領先的一站式電商及線上教學解決方案平台。透過我們獨特的雙開平台,商家和教育者可以在單一系統中同時實現開店和開課的功能,免去了使用多個平台的麻煩。想要快速開設線上店鋪的用戶將受益於 1share® 提供的完善電商購物功能,從商品管理到付款金流整合,全部一應俱全。此外,對於追求線上教育的專家和機構,我們提供完整的線上學習管理系統,並允許他們自行設定課程、價格和行銷策略。綜合我們與補習班的合作經驗,1share® 一直在努力研發更高效的雲端數位學習工具,以確保知識在網路上的順利傳播,達到最佳的推廣效果。
1share® 事業營運部
營業時間
- 星期一至五 10-12 / 13-17
- 星期六、日及國定假日 休息
諮詢電話
- 市話請撥 (04)2297-0977
- 行動請撥 (0982)842-977
線上諮詢
開店
開課
- 防錄盾® VideoShield®
- 功能介紹
- 開課客戶類型
- 開課介紹影片
- 影音播放工具
- 防盜錄身分證
- 資安加密保護
- 直播互動教室
- 多元支付金流
- 單鍵註冊帳戶
- 在線客服系統
- 課程簡訊服務
- 影片來源
- 上傳影片
- 觀看端
- 開課示範店